Wednesday, October 29, 2008

Give your article the Drop Caps

Wow... nice to see the article with Drop Caps on the head of first sentence.

Just simply steps your need to do :

A. If you have already drop caps structure in your blog , just do :

  1. Put this code in front of the word you want to be a Caps : <span class="awal">.
  2. Add this code in the back of the word : </span>

Example : Just want to tell you something

Put the codes : <span class="awal">J</span>ust want.....

It become : Just want to tell you something...

B. If you don't have drop caps structure in your blog ,just do as follow :

    1. Sign in your blog
    2. Click Layout
    3. Click Edit HTML
    4. Click Download Full Template, save and backup your first data/template.
    5. Copy paste this code between <b:skin><![CDATA[ dan kode
      ]]></b:skin> , or just put this code before
      ]]></b:skin>

      /* kode untuk hurup awal
      ----------------------------------------------- */
      .awal {
      float:left;
      color: #000000;
      background:#ffffff;
      line-height:80px;
      padding-top:1px;
      padding-right:5px;
      font-family:times;
      font-size:100px;
      }

    6. Click Save Template
    7. Finish
    8. Do section A, if you want to write an article

Have fun....Open-mouthed

Wednesday, August 6, 2008

Related Post #3

One of the best ways to keep your visitors on your blog longer is to provide related content to the topic your visitor is reading. If you’re using blogger or blogspot then there is a great plugin you can use to provide related posts to the current topic on your post pages. It is super easy to install and works smoothly with any template. In fact I have modified the script and use it on my own blogspot so it works even better. You can see examples of it on this blog. To use the related posts plugin just following these instructions:
1) Download the code to put into the template at Media Fire , it is a simple text file.
2) Next sign into blogger and click on Layout then click on edit HTML and check mark the “Expand Widgets Templates” box.
3) Find the line in the template that looks like this:

Now just copy and paste the code right after that line and click “Save Template”.
And now your blog has become a hub of related articles. Some things to keep in mind about this script though, are that it uses the label system in blogger so it will show any posts that have the same labels. You can find the original script that was designed at Jackbook.com .

Thank to Jackbook and Hoctro

Monday, August 4, 2008

Comment Box - on the 'bottom' your post

Now, blogger(blogspot) have developed their comment box. Last time ago, if we want to post a comment there should be only a link under our posting, and we have to click the link send a comment, it's not interesting. But now we can find a comment box under our post exactly. It's original from blogger, it's not like haloscan or intensedebate. But it's truely from blogger/blogspot. You can see it under this post.

Here is the trick to create comment box under your post .
1. Login to http://draft.blogger.com
2. Go to Setting-->Comments. then change "Comment Form Placement" to be "Embedded below post" (look at the image below)

3. Then "Save Setting"
Try to see your blog and klik on your titile post. if there is a embadded commnet box below your post just stop this step here. But if there is no comments box, just follow the next steps here.
4. Go to "Layout-->Edit HTML"
5. Check the "Expand widget templates" box.
6. Find this code :

<p class='comment-footer'>
<a expr:href='data:post.addCommentUrl' expr:onclick='data:post.addCommentOnclick'>
<data:postCommentMsg/></a>
</p>
</b:if>

7. Then replace it with this code :

<p class='comment-footer'>
<b:if cond='data:post.embedCommentForm'>
<b:include data='post' name='comment-form'/>
<b:else/> <b:if cond='data:post.allowComments'>
<a expr:href='data:post.addCommentUrl' expr:onclick='data:post.addCommentOnclick'>
<data:postCommentMsg/></a>
</b:if> </b:if> </p> </b:if>

8. Save your Template.

Have fun...

Recent Post - Unlimited Post

To show your recent post on the sidebar is very easy an fun, you just follow the instruction below then you will see your recent post on your blog sidebar. here’s the steps :

1. Login to Blogger then Chose "Layout"

2. Click on "Add page element" (chose where you want to put it) then chose "HTML/Javascript"

 
3. Copy the code below and put it in the "content" box.
<script src="http://www.geocities.com/uddin_81/recent-post.js"></script>
<script>var numposts = 20; var showpostdate = false; var showpostsummary = false; var numchars = 100; </script>
<script src="http://BLOGS.blogspot.com/feeds/posts/default?orderby=published&amp;alt=json-in-script&amp;callback=rp">
</script>

 
4. Change 'BLOGS' with your blogname.


5. The number "20" it’s amount of recent post that will be shown, You can change it.

 
6. Click

Save.

 
Have fun on it

Tuesday, July 29, 2008

Fun with Shout Box - Chat with your Friends !!

Do you talk with your group or your gank? You can choose Shout box as media. I take it from Kang Rohman's Blog.

Where you can get a shoutbox? there is very much site provide this service. One of them is http://www.shoutmix.com. At this site you can get a shoutbox for free (basic account). This is the steps for get a shoutbox at shoutmix :

  1. Please visit http://www.shoutmix.com.
  2. Before you must register, please click "CREAT YOUR SHOUTBOX NOW", or you can click "SIGN UP" at upper tab.
  3. If you are has registered at shoutmix, please login with your ID.
  4. At the column with title Style, click appearance.
  5. Then click pull down menu beside Load From Preset for setting your shoutbox, please select which you want. If it is done, don't forget to click Save Setting.
  6. To get HTML code for your shoutbox, please click "Use Shoutbox"
  7. Click at "Place Shoutbox on web page", write the width and hight you want.
  8. Copy all of the HTML code at text area below of "Generated Codes", paste at notepad and then save to your computer.
  9. Click "Log out" and then close.
  10. Done. now you have a shoutbox code for add to your blog.

Now you can add your shoutbox code to your blog, please following the steps :

  1. Login to blogger with your ID.
  2. After entering the dasboard page , click Layout. Please saw the picture :

    layout

  3. Click at Page Element tab. See the picture below :

    page element

  4. Click at Add a Page element.
  5. After emerging pop up window , Klik add to blog button for the things HTML/JavaScript. See the picture following :

    javascript

  6. Open your Shoutbox code, copy and then paste into available column.
  7. Click save changes
  8. Done. Please see the result.

Now you have a Shoutbox at your blog.
See you next time at my new post brother. Happy blogging.

Read More


If you are a beginner, possible you'd feel to surprise when seeing the articles in my blog presenting only shares first paragrap or second paragrap, and to read for full article, you must click Read more... link. Alright.. please don't feel surprise, i will discuss about this now.
The function like that called Post Summary. You can make a post summary function with add a little code to your template code. But this code is for new blogger template (beta) and does not work at classic template.
Please follow the steps below :
Step #1 :

  1. Login to blogger with your ID
  2. In the dashboard page , click Layout.
  3. Then click edit HTML tab.
  4. Click the Download full template link. Save your template (very important)
  5. Please mark the little box beside Expand Widget Templates. Wait for a moment.
    expand-widget.png
  6. Go to your template code, and find the code like this :

    <p><data:post.body/></p>

  7. Delete the above code and change with this code :

    <b:if cond='data:blog.pageType == "item"'> <style>.fullpost{display:inline;}</style> <p><data:post.body/></p> <b:else/> <style>.fullpost{display:none;}</style> <p><data:post.body/> <a expr:href='data:post.url'><strong>Read more...</strong></a></p> </b:if>

  8. Click Save Template button
  9. Step #1 is done.

Step #2 :
  1. Click Setting tab.
  2. Click formatting tab.
  3. Go to lower side. you will find a blank text are beside Post Template. Fill that blank text area with this code :

    <span class="fullpost"> </span>

  4. Click Save settings button.
  5. Step #2 is done.

How to post your article?
When you post your article, choose photo-posting_03.gif tab. and you will see the code below :
<span class="fullpost">
</span>

Place the first paragraps above of :
<span class="fullpost">

and place the rest of paragrap under of :
<span class="fullpost">

and above of :
</span>

and then publish your post. Done.
If you still feel confuse, this is the example how to place your article:
Lorem ipsum dolor sit amet, consectetuer adipiscing elit. Quisque sed felis. Aliquam sit amet felis. Mauris semper, velit semper laoreet dictum, quam diam dictum urna, nec placerat elit nisl in quam. Etiam augue pede, molestie eget, rhoncus at, convallis ut, eros. Aliquam pharetra. Nulla in tellus eget odio sagittis blandit. Maecenas at nisl. Nullam lorem mi, eleifend a, fringilla vel, semper at, ligula. Mauris eu wisi. Ut ante dui, aliquet nec, congue non, accumsan sit amet. (this will show in front of your blog)
<span class="fullpost">

Nulla in tellus eget odio sagittis blandit. Maecenas at nisl. Nullam lorem mi, eleifend a, fringilla vel, semper at, ligula. Mauris eu wisi. Ut ante dui, aliquet nec, congue non, accumsan sit amet, lectus. Mauris et mauris. Duis sed massa id mauris pretium venenatis. Suspendisse cursus velit vel ligula. Mauris elit. Donec neque. Phasellus nec sapien quis pede facilisis suscipit. Aenean quis risus sit amet eros volutpat ullamcorper. Ut a mi. Etiam nulla. Mauris interdum. . (this will show if visitor click read more)
</span>
At front page of your blog, will show just like this :
Lorem ipsum dolor sit amet, consectetuer adipiscing elit. Quisque sed felis. Aliquam sit amet felis. Mauris semper, velit semper laoreet dictum, quam diam dictum urna, nec placerat elit nisl in quam. Etiam augue pede, molestie eget, rhoncus at, convallis ut, eros. Aliquam pharetra. Nulla in tellus eget odio sagittis blandit. Maecenas at nisl. Nullam lorem mi, eleifend a, fringilla vel, semper at, ligula. Mauris eu wisi. Ut ante dui, aliquet nec, congue non, accumsan sit amet. Read more...
The last, if you try this hack and you not succes, don't be panic. upload your backup template, and it's will be back to template code before you do edit.
Allright my friend, i think this enought. See you at my next post.

Funniest time in Blogging with Blogspot

It's FREE for fun-blog, yes It's FREE.

Configure your Blog with Blogspot is easy , please follow the guidance below and you can get more fun on it :

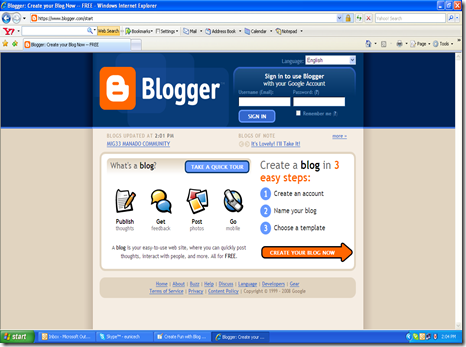
  1. Browse to Blogger.Com or Click here.
  2. You had to have a G-mail account to Login and start your journey, if you don't have a G-mail account, just create G-mail account here .
  3. Are you finish? , Step 1 : CREATE account , please choose no.1, Create an Account, type your g-mail account and password.image
  4. Fill the word that you want to show in your blog.
  5. You can see verification word, just repeat that word and put it on box.
  6. Add Mark sign for Condition and Service.
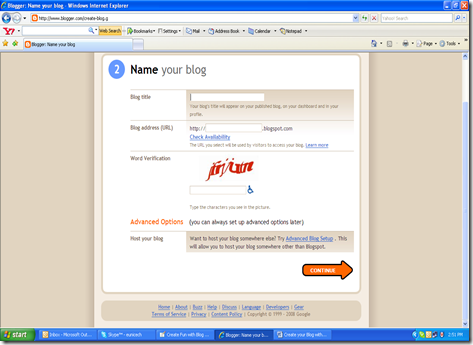
  7. Step 2 : Name Your Blog, please pick one name for your blog, it should be easy to remember and sound like familiar, up to you friend ! image
  8. Complete URL address, choose one word related your link or word is easy to remember.
  9. Check availability of this address, change the word if somebody had chosen the address, search another word.
  10. Click next
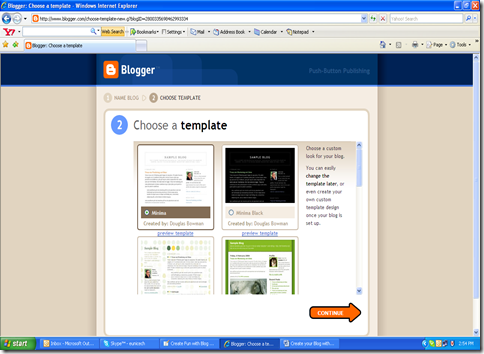
  11. Step 3 : Choose a TEMPLATE, you can choose one template here,before you pick , just make a preview to see how it's lookimage
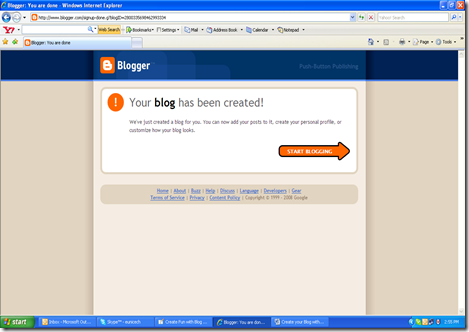
  12. After you choose you, please click next to start POSTING. But wait untill your blog appear in front of you , yes there it is. And there will be a confirmation word show up to mention that your account is ready!!!!image
  13. Now you can fun posting a blog / article / photo / video

Enjoy your Blog Journey.

Give your article the Drop Caps

W ow... nice to see the article with Drop Caps on the head of first sentence. Just simply steps your need to do : A. If you have already dro...